How I got Lotus Connectors (LCLSX) to finally connect from our IBM i to a remote Windows DB/2 server
If you have seen error messages like “30061 - Error: Relational database BLABLA not found., Connector 'db2', Method -Connect- (-30061) - Relational database BLABLA not found.” or “Error: Communication error occurred on distributed database processing. See SQ30080 for invalid possibilities. A common error is that the password is case sensitive and is not being provided in the correct case” you’re not alone!
Read on how to see the bigger picture on how IBM i’s “Relational Database Directory Entries” should be configured based on what you see in the real target database. Finally you’ll see how to code Lotus Connectors LSX (LCLSX) to use this information to connect to the database.
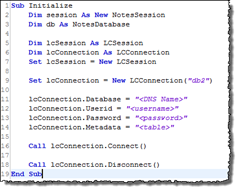
Most of our Domino servers run on IBM i (aka System i, iSeries and AS/400). Since IBM i have DB2 natively supported, there is no need to install DB2 Client or DB2 Data Server Drivers (more on those below). The target DB/2 server is running on a remote Windows server, and I thought it would be a breeze to connect IBM i and the Windows machine together. Not so! First and foremost, there is sparse information on the net on how to exactly do this. You very quickly find sample code similar to this;
So how come the code above bails out at the Connect-method?
The target database
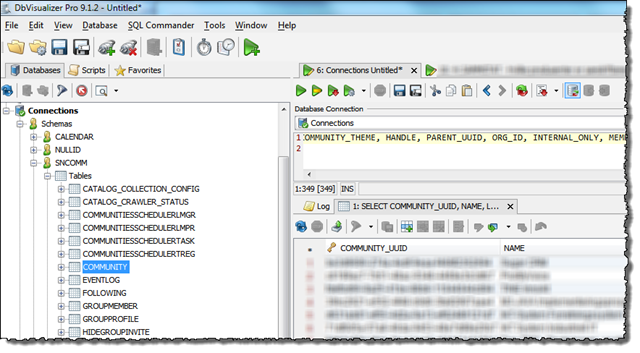
Besides having a valid userid and password to access the DB/2 database, I recommend you to look at the database with a tool like DbVisualizer from DbVis Software to be 100% sure about database- and table names. Log on to the database and try out some simple selects to be sure your userid actually can see data in the first place. Nothing is more frustrating than fighting with configuration on zillion places, and then discover that you could see the data in the first place! Below you see how I verify that I actually have data in the target table;
I also make a note about what the target database IP address is, what port it use, the database name and table I want to access. I my case the data are;
| IP | 10.10.10.10 |
| Port | 50000 |
| Database | SNCOMM |
| Table | COMMUNITY |
Note that I don’t use the real IP address in this sample. But remember 10.10.10.10 as I will use it further down this article!
Something inbetween – how to make your Domino Designer be able to access the database too
It has been best practices for ages not to hardcode actual connection details directly into your code. You typically want to define the connection details in some middle layer between the code and the databases. This way you don’t need to bring in the code monkeys every time the location of a database changes. You only tell the administrators to change the connection details instead.
On a Windows machine you must typically use the ODBC Manager to set up a connection to the databases you want to use. Don’t pay too much attention to the word ODBC which reflects just one programming API towards databases. These days most other databases also plug themselves into the ODBC Manager and let you configure the connection details. Below you see how Data Sources (ODBC) looks on a Windows 7 machine;
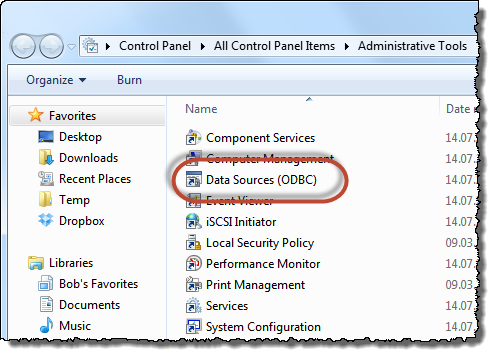
A very important but somewhat subtle issue: When looking up the ODBC Manager above on your 64-bit Windows 7 machine. You will actually see the 64-bit version of the ODBC Manager! Since the IBM Notes client (and thus the Designer) is an all 32-bit application, it means that Notes can’t load and use any 64-bit components. We must therefore find the 32-bit ODBC Manager …
Open the Start menu, and start typing “odbc” like shown in the screen shot below;
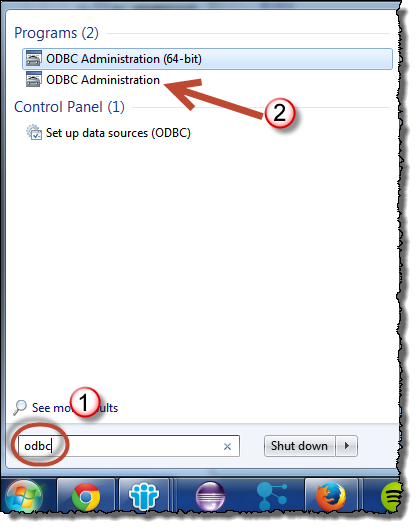
Windows will filter the content to match your content, and now you see a non-64-bit ODBC Administration. This is what you want to use!
Below you see my 32-bit ODBC Manager. Note the IBM DB2 ODBC DRIVER-name. This indicates that I have installed the IBM Data Server Drivers on my Windows 7 machine. See at the end of this article on how to find and install the Data Server Drivers.
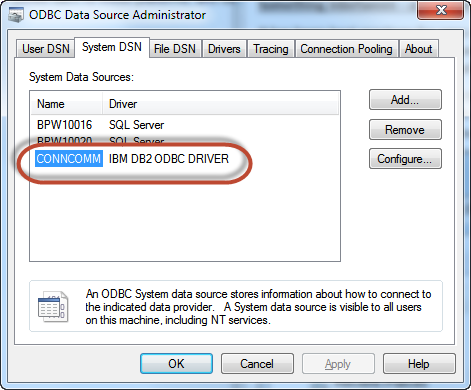
Above you see how I have registered the Data Source with the name CONNCOMM. The Data Source Name or DSN for this registration is CONNCOMM, and if I open it up it contains the connection details to the target database;
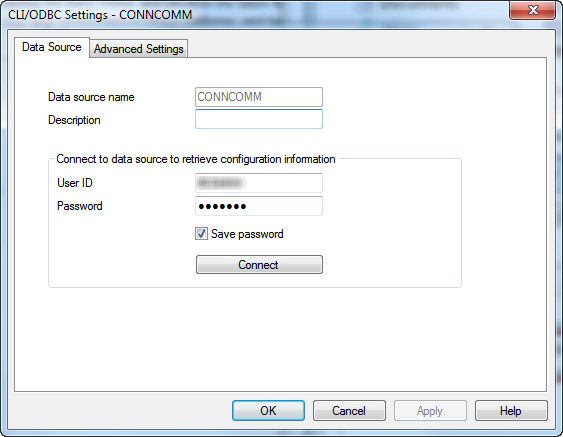
The DSN name is very important to remember. You will use it in both the LotusScript code and on the IBM i. This is the name that binds it all together! The user ID and password fields contains the user id and password to access the target database. Below you see the details behind the Advanced Settings tab;
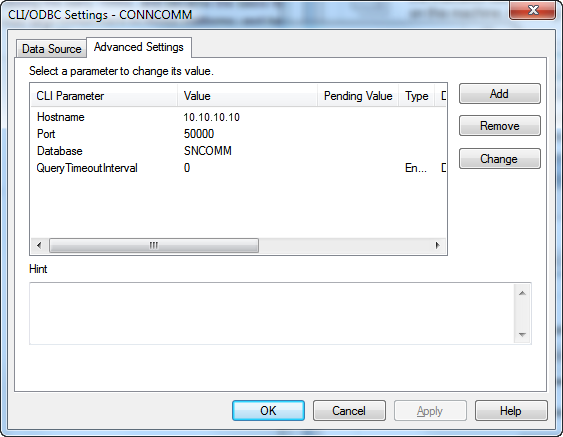
The parameters are;
| Hostname | 10.10.10.10 (the IP address or IP-name of the target server) |
| Port | 50000 |
| Database | SNCOMM |
| QueryTimeoutInterval | 0 (must be there so the IBM i connection doesn’t time out) |
By running or debugging the LotusScript below, you should be able to connect and get data from the target database. I recommend that you get this working before you attempt to run the code on the server. Remember, we must be able to walk before we can run!
If you haven’t installed the IBM Data Server Driver-package, take a peek at the last section in this article!”"
Create a test-agent to check connection
Before I attempt to transfer thousands of records, or do any production work, I like to have a small agent to check connection.
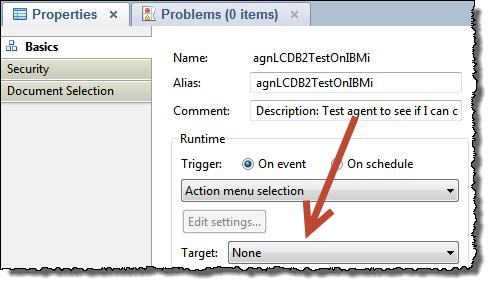
Create a LotusScript-agent with run-target set to None, like shown below;
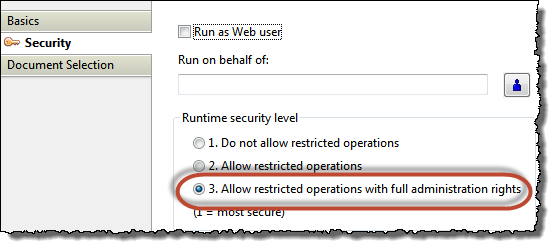
Also ensure that the Runtime security level of the agent is set to 3 (Allow restricted operations with full administration rights)
The content of the agent can be something like this:
UseLSX "*lsxlc"
Sub Initialize
Dim session As New NotesSession
Dim db As NotesDatabase
Dim strMsg As String
Dim strExtMsg As String
Dim lExtCode As Long
On Error GoTo ErrorHandler
Print "Init " & CStr(Now)
Dim lcSession As LCSession
Dim lcConnection As LCConnection
Set lcSession = New LCSession
Print "Establish DB2 connection"
Set lcConnection = New LCConnection("db2")
Print "Set DB2 connection parameters"
lcConnection.Database = "CONNCOMM"
lcConnection.Userid = "<user id>"
lcConnection.Password = "<password>"
lcConnection.Metadata = "SNCOMM.COMMUNITY"
Print "Connect"
Call lcConnection.Connect()
Print "Disconnect"
Call lcConnection.Disconnect()
Print "Success!"
Exit Sub
ErrorHandler:
If lcSession.Status <> LCSUCCESS Then
Call lcSession.GetStatus(strMsg, lExtCode, strExtMsg)
Print CStr(lExtCode) & " - " & strMsg & " - " & strExtMsg
Call lcSession.ClearStatus()
Else
Print CStr(Err) & " - " & Error(Err) & " (line " & CStr(Erl) & ")"
End If
Exit Sub
End Sub
Explanation of the code above.
The first and very important line of code is UseLSX “*lsxlc”
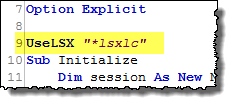
It tells the interpreter to load the Lotus Connectors LSX. The next lines define some LotusScript objects for LC.
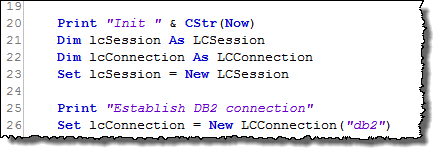
We need the LCSession-object in the bottom. The LCConnection-object holds the connection itself, and as you see from above I initialize it with “db2”. This instructs the interpreter to load the DB/2-connector.
The block of code sets some parameters …

Why on earth do I have to specify connection details like user id and password here, you rightfully ask! Didn’t you say above that it was best practices not to do this? Well, yes, and as many times before it turns out that the bindings between the LotusScript code and the DSN-registration doesn’t carry everything over. So, unfortunately, we have to specify the user id and password again here. But in production code, I would of course retrieve the user id and password from a configuration- or profile-document. Below I discuss the LCConnection parameters
| Database | CONNCOMM (This is actually the DSN-name that Lotus Connectors will look for. Remember, we initialized the LCConnection object with “db2” and that means that the connection object will try to read db2cli.ini and db2dsdrivers.cfg – much more on those files in the last section in this article!) |
| Userid | The target database user id |
| Password | The target database password |
| Metadata | <database name>.<table name>. From the target-database section above, you see that the database name is SNCOMM and the table name COMMUNITY. This has to be specified like SNCOMM.COMMUNITY here |
The next lines in the code are;
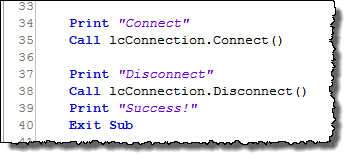
The Connect-method will fail very easily if any of the above definitions is wrong! Then you see messages like the ones I started this article with.
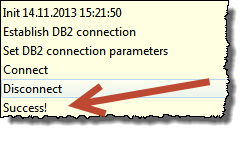
If everything goes well, you will get the Success-line in the Notes client status-bar!
IBM i
So your code now runs on your developer machine, with the IBM Data Server Driver-package and all. Now it’s time to get the agent above on the IBM i server! Your first goal is to get the following messages popping up on your server console;

As you see, it is the same result as for the client-run. How to get here?
First of all, as mentioned before, IBM i contains the DB/2 client parts natively. This means that you probably don’t have to install a thing on IBM i!
However, IBM i does need to know where the target database is located, much in the same way as the ODBC Manager on Windows. The trick is to add an entry into the “Relational Database Directory Entries”. You do this with the WRKRDBDIRE CL-command on IBM i.
Begin by typing 1 (Add/Create) in the Alt-column, and then specify SNCOMM (the target database name) in the line, like this:
Also note the default entry named <servername> and *LOCAL. This must be in place too, but normally are. The norwegian text “Post tilføyd av system” means “Post added by system” ![]()
Then finish the definition like this;
In the field below SNCOMM, register the DSN-name CONNCOMM. In the Name or Address field, register the IP-address (IP-name will probably work too, if you have a working DNS-server in your network). Finally specify the port number 50000. All other fields can have their default values.
When you click enter, you’ll see how the DNS-name registration pops up in the list;
You are now done configuring IBM i!
You are now ready to test the agent on the server. Remember the agent we wrote in a section above? That was an agent coded to run in the context of the Notes client. In order to get that agent to run in the context of the server, you can do two things. Either you change the agent to run on a server schedule or perhaps better - you create a simple wrapper agent which will run the old agent in the context of the server. Below you see how that is done;
Create an agent to run from the menu, with the runtime-target set to None (this is the same as for the previous agent). Insert some code like this;
Sub Initialize
On Error GoTo ErrHandler
Dim session As New NotesSession
Dim db As NotesDatabase
Dim agent As NotesAgent
Set db = session.CurrentDatabase
Set agent = db.GetAgent("<your name or alias of the previous agent>")
If agent.RunOnServer() <> 0 Then
MessageBox "Ooops, an error occurred when triggering the agent",16, "Trigger agent on server"
End If
Exit Sub
ErrHandler:
Print CStr(Err) & " - " & Error(Err)
Exit Sub
End Sub
Replace the blue text “<your name or alias of the previous agent>” with whatever name you gave the previous agent. The pepper in the agent above, is that we get a NotesAgent-handle to the previous agent and then call it with agent.RunOnServer(). This means that the agent will run on server and in the context of the server. As a result, you will see the first screen shot if you bring up the Domino server console, or if you look in the log.nsf later. Please remember that the database with these two agents should be placed on the Domino server in the first place!
You should now have a Lotus Connectors, DB/2 driven, connection with a remote DB/2 server. Let the data roll!
IBM Data Server Drivers – how to find them and install them
By default Windows machines doesn’t come with support for connecting to DB/2 databases. This support either comes as a side-benefit of installing a full DB/2 client. These are full application suites with tools similar to DbVisualizer and more. While you can install this if you want, you can download and install a much smaller package named “IBM Data Server Driver Package”. This installs just the stuff you need to accessDB/2 databases via ODBC Manager and other channels.
How to get the Data Server Driver Package? If you are an IBM customer, you can download the package from IBM passport advantage or if your are an IBM partner, you can use IBM Partnerworld. Either way, you navigate to the Software Download, and look for the IBM Data Server Driver
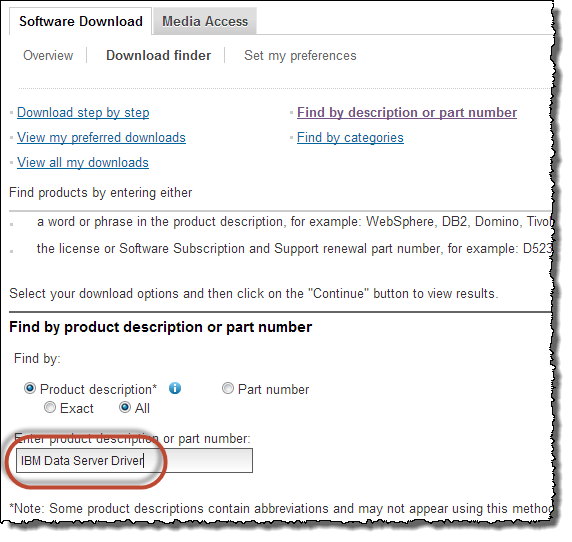
Note I clicked on “All” above too, just to be sure the search engine finds something with all my words. Below you see the search result;
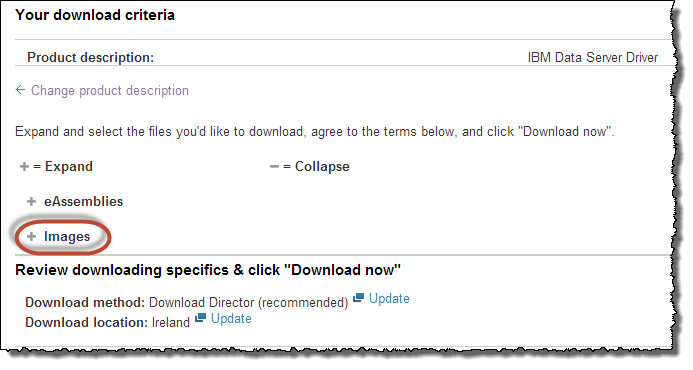
Well, you don’t see anything yet. Click on the “Images”-link to reveal the found content. Now, which package do I need from all these? I downloaded the latest release I could find (and at the time of writing that was V10.5). Also go for the Windows- and 32-bit related packages.
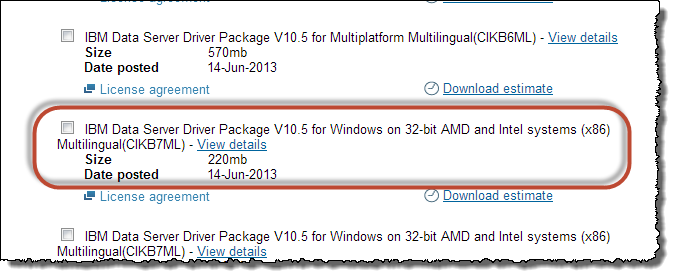
In words I chose “IBM Data Server Driver Package V10.5 for Windows on 32-bit AMD and Intel systems (x86) Multilingual(CIKB7ML)”. When downloaded, you will see that it contains several packages. I used the one named “v10.5fp2_nt32_dsdriver_EN.exe”.
Install it – and when you are finished – you must reboot your machine! If you don’t do this, nothing will work ![]()
First thing you should do then, is to run db2cli install –setup from the program directory C:\Program Files (x86)\IBM\IBM DATA SERVER DRIVER\bin. This will install the IBM DB2 ODBC DRIVER DLLs in the ODBC Manager.

When you have installed this package (accepting the default values), you end up with a data directory named something like C:\ProgramData\IBM\DB2\IBMDBCL1\cfg too. Below you see my directory. The two yellow-marked files are the ones that will be present on install time.

The db2cli.ini is extremely important (well, db2dsdrivers.cfg are too, but more on that later). This is the actual DSN-register for the DB2 DLLs on the machine. Yes, DB/2 doesn’t read ODBC Manager registrations directly, it reads this file! You may however be calmed that the this file is automatically created and maintained via the ODBC Manager. So when you create and modify any IBM DB2 ODBC DRIVER connections in ODBC Manager, the ODBC Manager will create and update the db2cli.ini file automatically. What does it contain if you peek at it?
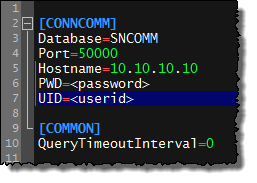
You probably recognize the content ![]()
The other important file is the db2dsdriver.cfg file. This file is not created by default, and I had to create it myself (Process Monitor from SysInternals … errrh, Microsoft, is your best friend to see what files any process actually work with). The content of the db2dsdriver.cfg file are;

Again we have to do some extra configuration. The content are;
<configuration>
<dsncollection>
<dsn alias="CONNCOMM" name="CONNCOMM" host="10.10.10.10" port="50000"/>
</dsncollection>
</configuration>
If you fail to create the above file, you might get this error message from Lotus Connectors;
SQL1531N The connection failed because the name specified with the DSN connection string keyword could not be found in either the db2dsdriver.cfg configuration file or the db2cli.ini configuration file. Data source name specified in the connection string: "CONNCOMM".


Comments
thanks and regards
Dominic
Posted by Dominic At 12:38:00 On 29.12.2015 | - Website - |