How I added Textbox.io rich text editor to XPages
Tags: Xpages
What about replacing the built in rich text editor in XPages with a super-modern editor which accepts image-pasting directly, without configuring anything on the server?
What about replacing the built in rich text editor in XPages with a super-modern editor which accepts image-pasting directly, without configuring anything on the server?
You can find the sample database here.
Why this database?
In the IBM Notes client we have almost always (since 1993 ....) had extremely powerful rich text possibilities. You can attach, import and paste images and attachments at will and place them wherever you want inside a rich text field. On the web, not so at all. Over the years many rich text editors have allowed images and attachments to be uploaded via various techniques. Often via a separate button titled "Browse" to first select the files to upload, then an "Upload"-button to transfer the files to the server. XPages has similar possibilities with the built-in rich text editor controls, combined with the File Upload and File Download controls.
What is missing? The ability to paste images into the editor! When I create documents, I very often want to include screen shots from SnagIT (https://www.techsmith.com/snagit.html), and having to save these first, and then use the file upload controls makes it too cumbersome!
Why hasn't this been resolved long time ago? Because of security! The browsers has historically had very limited possibilities to access the hardware outside it's own reign, such as the file system and clipboard. This has made it very hard to actually grab the clipboard content at all. Therefore different solutions emerged, such as Flash-controls and Java based solutions such as Ephox's Editlive. Using these solutions however often forced the end-user into a plethora of dialog boxes to allow the editors to access back-end services. In Norway we all remember the Java based BankID-solution, which forced the end-user to re-allow the ever-changing Java security to access your computer. Hopelessly cumbersome! We all love that it (and Flash) vanished!
Some years ago HTML evolved and introduced a couple of new APIs namely the File API (http://www.w3.org/TR/2015/WD-FileAPI-20150421/) and Clipboard API (http://www.w3.org/TR/2015/WD-clipboard-apis-20150421/). One of the first vendors to actually make these APIs work was Google in their Google Mail client. Finally you could just paste images into the online rich text editors!. However, it was very hard to understand how Google actually did this, and very (VERY) few other vendors actually made something similar. Even today, real image-pasting is still sparse amongst the different solutions, and very (VERY) often they require configuration changes to the server to allow images to upload and so forth.
Meet Textbox.io from Ephox - A single javascript file replaces a div- or textarea in your HTML, and allows for instant pasting of images. Instead of needing to upload an image to the server, Textbox.io convert the pasted image to an in-line Base64-encoded string. This means that the image rests right inside your HTML. The disadvantage is that the HTMLs quickly grows in size, and therefore Textbox.io - just like the other solutions - allows to configure real file uploading behind the scenes. This of course needs configuration on the server, like the others. The others? Take a look here: http://socialcompare.com/en/comparison/javascript-online-rich-text-editors
A little word of warning: Textbox.io is not free - in fact it is pretty expensive. Hopefully the technique shown in this article can be valid for other editors as well.
How to enable Textbox.io in XPages
I have created a sample database where I demonstrate how to include Textbox.io in your XPages solution.
Create an empty database and set the Access Control List (ACL) to allow to editor access for Anonymous users.
The reason for having editor access is that the XPage later needs to update a temporary document. Another solution could be to work with writable public documents.
Download the API from http://textbox.io and make it available to XPages
One way is to copy the textboxio-directory directly to your Domino server's Domino\html-directory. The main benefit of this approach is that the Textbox.io files are available to all databases without any further ado. However, I found somewhat cumbersome to import and use these files in XPages, even though I understand that it is easy and possible to do with XPages Themes.
Another way is to import the textboxio directory directly into the XPages database. I found the article "Importing an entire JavaScript library into a database" (http://linqed.eu/2012/10/09/importing-an-entire-javascript-library-into-a-database/) by Mark Leusink, I was able to just drag the whole directory into the WebContent area. To make the WebContent-area visible, you have to switch to the Java perspective in the Designer, like this:

By having the textboxio-resources here, they are immediately available to the XPages.
Switch back to the XPages perspective if you prefer.
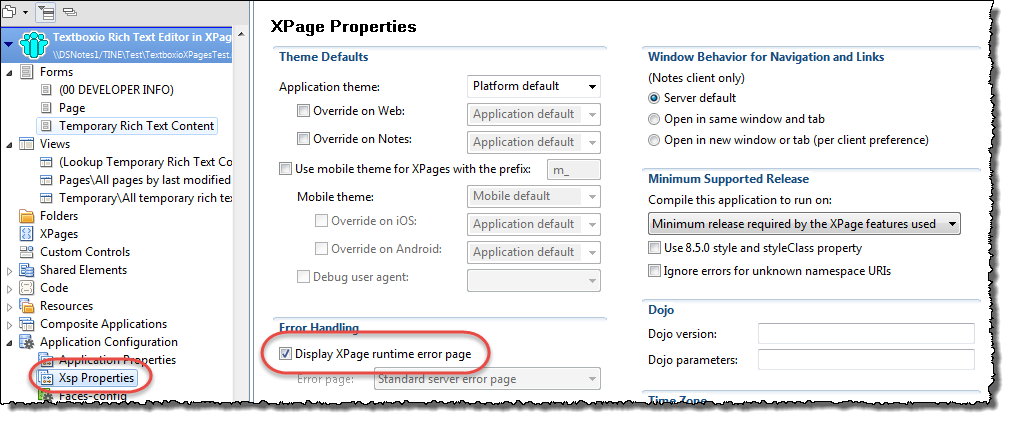
Ensure that your database can display detailed XPages errors - and - that the Extention Library is included in the database.
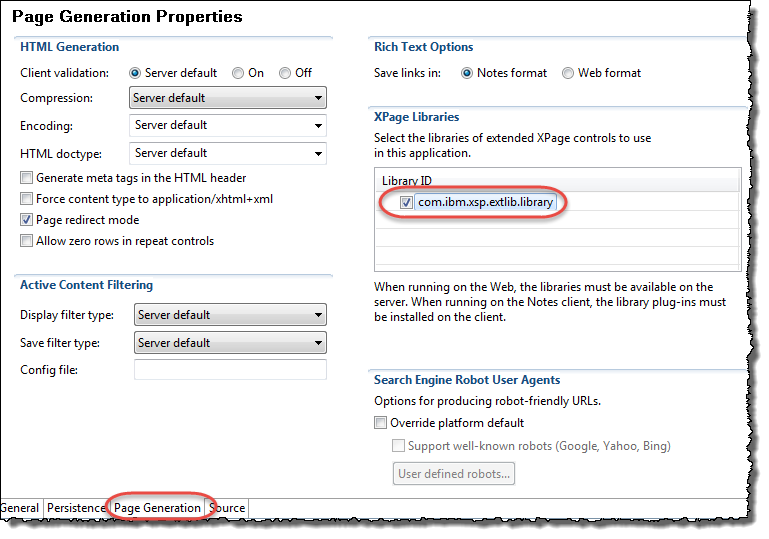
Yes, you need Extension Library from OpenNTF for this project. I use the ExtensionLibraryOpenNTF-901v00_12.20150311-1316.zip version.
Create the back-end Notes forms to hold the data. In the example database I have created some super simple forms, one with the design-alias fPage and one with the alias fTemporaryRichText. The first form will be the hinge, containing the complete HTML in the end. The latter form contains the rich text content as it is whenever the user press Save. Post-processing will combine the two documents into a single fPage-document in the end.
Below you see the fPage being created:
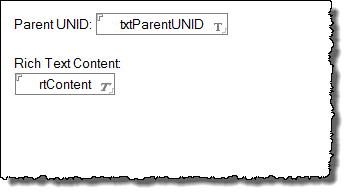
Below you see the three fields inside the Notes-form;
Nothing fancy about any of the fields. Note that the rtContent-field is an ordinary rich text field too, no "Store contents as HTML and MIME".
The same goes for the fTemporaryRichText-form:
Again, nothing fancy here.
How to code the XPage
Normally I would put my XPages stuff into Custom Controls, but for the sake of simplicity I just create a XPage.
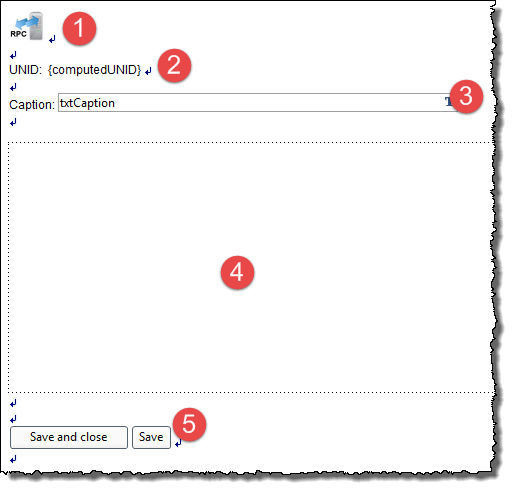
Below you see a screen shot of the page with its 5 main components;
Behind the scenes I also use the Remote Service to read the content if it already exist, and thus feed the HTML into the editor. You find this code in the onClientLoad-event on the XPage itself, as shown below;
I will go into great detail about the rpcPage-object later, but for now it is pretty clear that we get the HTML if it exist, and put it into the global javascript editor referenced by the g_divEditor variable. That variable is simply created in the following script code;
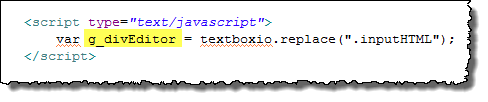
This is also where the textboxio-code comes to action and do the actual replacing of the div with the class "inputHTML".
How to get a unique key that doesn't change at the second you try to save the document?
In classic Notes the main trick is to use a computed when composed field, with some sort of unique-code like @Text(@DocumentUniqueID()) or @Unique as the formula. Since it is computed-when-composed the value will never change again.
It turns out that the concept of computed-when-composed doesn't quite exist in XPages, probably due to the stateless nature of the HTML. One nice writeup of this is found in Brad Balassaitis' Computed When Composed Fields in XPages . In essence one of the tips involves working with the XPage's beforePageLoad-event. I found another source for the same technique in Kathy Brown's XPages: No Experience Needed presentation from IBM Connect 2013. Below you see my version of these tips:
The code is placed in the beforePageLoad-event (1 and 2) by using the script editor (3). The server side javascript (SSJS) code does the following:
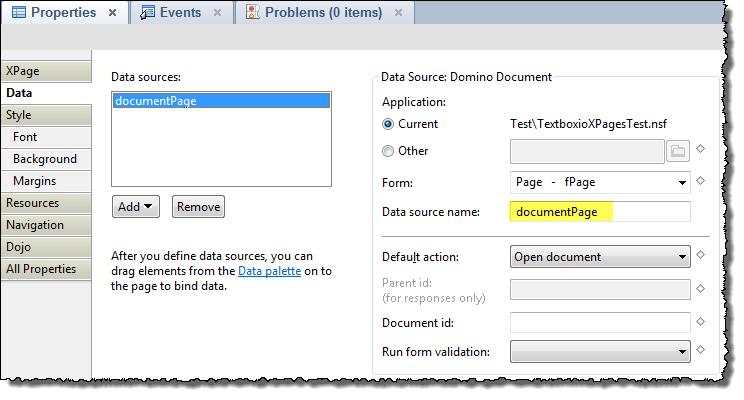
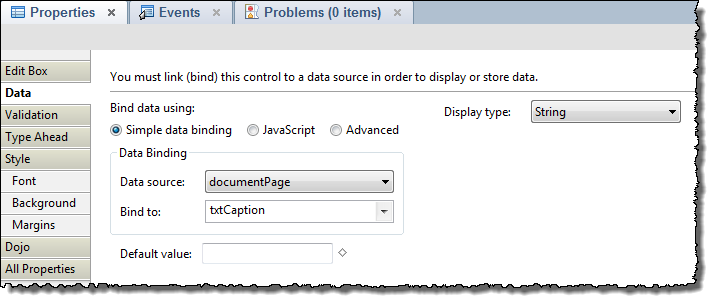
First we check if the documentPage is a new document. documentPage is the data source name for the data binding on the XPage - as shown below:
If so, we create a unique string. I like to use the UNIDs and thus create a dummy document and grab the UNID at (4).
At (5) I save the UNID back to the backend Notes document's field txtUNID. Remember that this field is bound to the XPage's computed field computedUNID.
At (6) I also save the UNID to the viewScope's UNID variable. This will later be referenced when we set- and get the HTML.
If the document isn't new, we copy the value from the backend Notes document at (7) into the viewscope variable. Thanks Kathy for showing me this!
This means that I now can access an UNID via the viewScope-variable. It doesn't change during the lifetime of the page, and that behaves much like a computed when composed field in Notes.
The basic XPages setup
Nothing too spectacular here. Note the data source name.
1. The computed field inputUNID
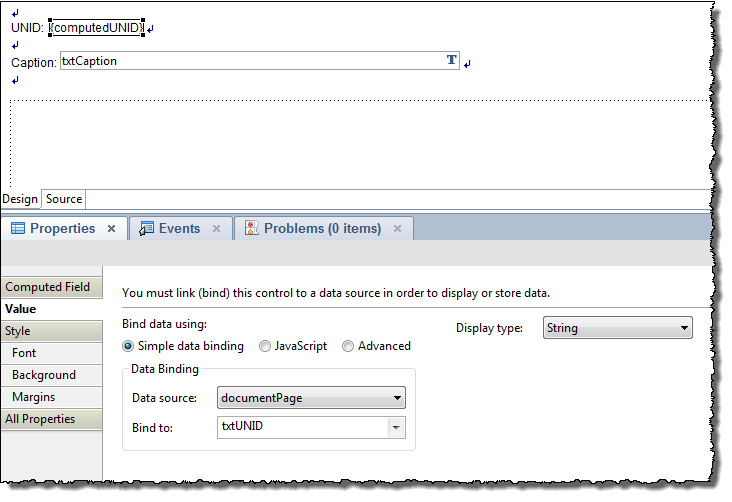
Note that the computed field is bound to the txtUNID field.
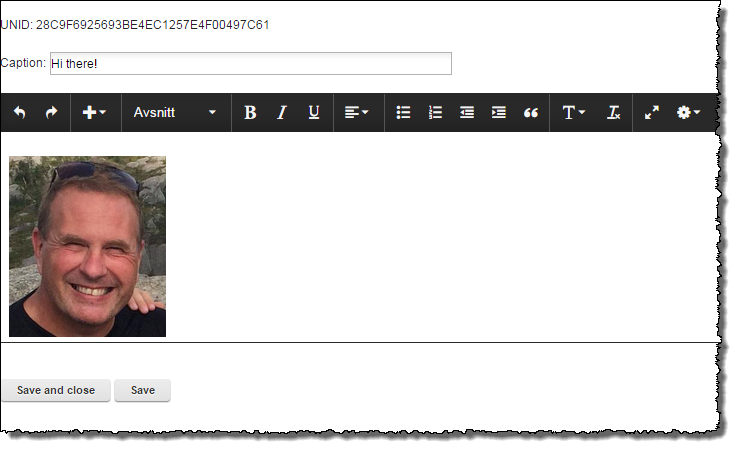
2. The caption edit box
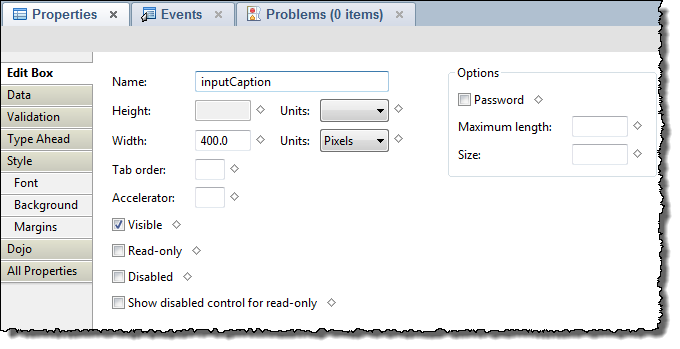
This field is bound to the txtCaption field in the fPage form.
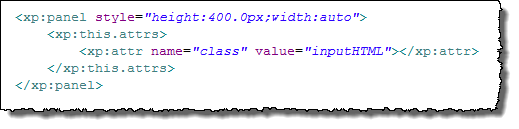
3. The panel with class "inputHTML" - the placeholder for the editor-to-come
This panel (which will be equal to a div when page is rendered) will be replaced by the Textbox.io editor during initialization of the page.
Textbox.io supports both div and textarea replacements. I can also replace div or textarea with a specific id, or a class.
When I worked this sample out I first tried to use a textarea, as you would probably get the data automatically transferred to the server during submit, but unfortunately I very quickly ran into the 32 kB limits in Notes. I tried all sorts of work-arounds, but due to my limited HTML/XPages knowledge, I couldn't get the data over to the server. I even tried to have a bunch of text fields holding each only a small number of bytes (think InputContentPart001, InputContentPart002 etc) and splitting the content from the editor into parts. Didn't work for me!
Therefore, I use a panel with a class attribute set, so the Textbox.io code can find and replace the panel by it's class, with the Textbox.io editor.
The resultant XPages code looks like this:
4. The Remove Service control - using the JSON RPC
One of the big hurdles in beginning web development - at least for me - is to fully understand how and when data will be sent back and forth between frontend JavaScript and backend serverside JavaScript.
Now, this isn't a problem if you just stick to the standard XPages controls available out of the box. You can easily create forms with fields, rich text fields, file upload- and download controls almost without programming. Data travels nice between frontend and backend!
If you want to do something special, things change - probably because of me not having enough knowledge! Way too often I end up fighting with my code, trying to relay data, and ending up with nothing on the other end! It reminds me a lot of classic Notes agent-programming back in the beginning of Notes development. It took many years to master how and when to do stuff with @formulas too
The Extension Library brings a new kid to town, meet The Remote Service control! The Remote Service control creates an easy to configure and easy to use pipe between frontend and backend. It is also very very fast and called instantly, meaning that I do not depend upon different states or phases. When the code is called, it is called!
One of the references I found that helped a lot was Brad Balassaitis's article Improve XPages Application Performance with JSON-RPC. Unfortunately this article is published on the soon-to-die THE VIEW, but I also found it here. After fiddeling with the Remote Service, I couldn't understand why I couldn't save values to my own document, but Brad address this caveat here:
(screen shot from THE VIEW article)
The pepper is here: "Also, if you make any changes to the current page in the SSJS procedure, they will be lost"
Unfortunately the article by the late Tim Tripcony (RIP) doesn't work, and I can't seem to find it either. Therefore I had to work out my own way of storing data. I ended up having a temporary document (bound to the form fTemporary RichText) linked to the main page by the UNID retrieved from the viewScope.
By the way, another good resource for understanding the JSON RPC is John Jardins blog article XPage vide tutorial - Remote Services (RPC).
Ok, armed with info, add the Remote Service to your XPage.
Below you see where I found it in the Controls palette;
Many places you'll see that it is recommended to put the Remote Service control in a custom control which appears on all your pages, such as in an Application Layout control. This way you have it accessible from everywhere.
Below you see how it is configured in my database:
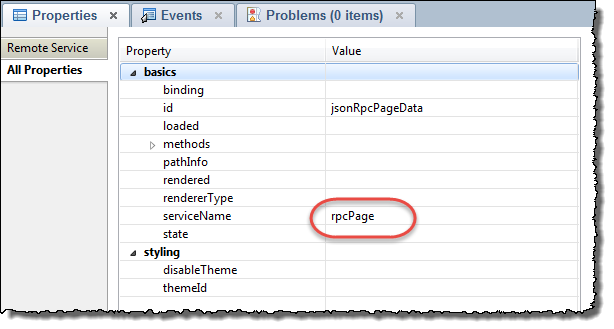
The circled serviceName property is given a name rpcPage. This is the name that I will reference the JSON-RPC control by later on. The really cool thing about this control is that you quickly can create your own methods to it! Remember, these methods will be directly accessible to frontend javascript on your client!
Below you see how I have expaned the methods-property from the screen shot above;
See the name property first, marked at (1). I called my first method setHTML (the idea is that I put, store, save or set the HTML in the temporary document). The setHTML method accepts to string parameters, paramRTFieldName and paramHTML at (2) and (3). Finally the server side javascript is placed in the script-method marked by (4).
Taking a look at the SSJS script below;
As you see, I have a some debug-statements in my code too. Makes it easy to follow what happens in a Domino Console. The code above open a backend view lupTemporaryRichText and refreshes it. First thing is that we retrieve the UNID from the viewScope-variable UNID. Then the code tries to grab any existing temporary document with that UNID. If it wasn't found, the SSJS code will create one and set the form and txtParentUNID fields.
Next the code checks if it found a rtContent-field, and if so, delete it. Then it is time to create the rtContent rich text field, and append the paramHTML text to it. Finally the document is saved.
In other words, here we have immediate SSJS-power directly from CSJS side!
One minor disadvantage is that the code editor dialog box above isn't a full fledged code editor. You are on your own code wise here, and perhaps it can be wise to pack the code in something debuggable first.
Ok, the next method I have put into my rpcPage-object is getHTML() which does the reverse thing. If it find a temporary rich text content document when the page is first opened, it returns the HTML back. The idea is here to be able to retrieve any content previously stored.
How is the JSON RPC controll used and called in the XPage?
The last piece of the puzzle is now to call the rpcPage object's methods setHTML to save the HTML and getHTML to load the editor with any existing data.
First the setHTML(). On the Page I have two buttons, the Save and Close which is a submit button and the Save button which is an ordinary button. The code for both buttons are excactly the same. Below you see the code:
I have added the code on the OnClick-event (1) on the Client tab (2) using the Script Editor (3).
First I grab the content of the editor (marked with (4)) via the global javascript variable g_divEditor's content.get(). This is the API from the editor Textbox.io, click here to see the description of the set- and get methods.
At (5) I call the rpcPage's method setHTML with the parameters. Easy! Note that I return an rpcObject which I add a callback to at (6). This callback will be called when the setHTML is finished.
Now you can save the HTML, which behind the scenes is stored in a temporrary rich text content document!
How to get the HTML at page load and fill the editor with any existing HTML?
When we open an existing page, it might have an appurtenant rich text content document too. If so, the rich text from this document should be read and fed into the Textbox.io editor at page load. I have stored the following code in the XPages onClientLoad event, at the Client-tab (2) using the Script Editor at (3);
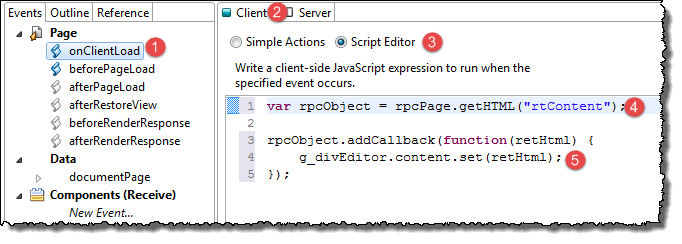
Almost the same code as for the save buttons, but now I use the getHTML() method instead at (4). Again I add a callback at (5), which gets any potential HTML and feed it into the Textbox.io editor via the content.set() method. Easy!
Wrap it all up with a simple view
Just to have a small view around the Page with Textbox.io editor on it, a view like this has been created;
Click on New page to create a new document, or click on the caption to open existing documents;
Hope this is helpful for someone!
Ideas for further development
Why this database?
In the IBM Notes client we have almost always (since 1993 ....) had extremely powerful rich text possibilities. You can attach, import and paste images and attachments at will and place them wherever you want inside a rich text field. On the web, not so at all. Over the years many rich text editors have allowed images and attachments to be uploaded via various techniques. Often via a separate button titled "Browse" to first select the files to upload, then an "Upload"-button to transfer the files to the server. XPages has similar possibilities with the built-in rich text editor controls, combined with the File Upload and File Download controls.
What is missing? The ability to paste images into the editor! When I create documents, I very often want to include screen shots from SnagIT (https://www.techsmith.com/snagit.html), and having to save these first, and then use the file upload controls makes it too cumbersome!
Why hasn't this been resolved long time ago? Because of security! The browsers has historically had very limited possibilities to access the hardware outside it's own reign, such as the file system and clipboard. This has made it very hard to actually grab the clipboard content at all. Therefore different solutions emerged, such as Flash-controls and Java based solutions such as Ephox's Editlive. Using these solutions however often forced the end-user into a plethora of dialog boxes to allow the editors to access back-end services. In Norway we all remember the Java based BankID-solution, which forced the end-user to re-allow the ever-changing Java security to access your computer. Hopelessly cumbersome! We all love that it (and Flash) vanished!
Some years ago HTML evolved and introduced a couple of new APIs namely the File API (http://www.w3.org/TR/2015/WD-FileAPI-20150421/) and Clipboard API (http://www.w3.org/TR/2015/WD-clipboard-apis-20150421/). One of the first vendors to actually make these APIs work was Google in their Google Mail client. Finally you could just paste images into the online rich text editors!. However, it was very hard to understand how Google actually did this, and very (VERY) few other vendors actually made something similar. Even today, real image-pasting is still sparse amongst the different solutions, and very (VERY) often they require configuration changes to the server to allow images to upload and so forth.
Meet Textbox.io from Ephox - A single javascript file replaces a div- or textarea in your HTML, and allows for instant pasting of images. Instead of needing to upload an image to the server, Textbox.io convert the pasted image to an in-line Base64-encoded string. This means that the image rests right inside your HTML. The disadvantage is that the HTMLs quickly grows in size, and therefore Textbox.io - just like the other solutions - allows to configure real file uploading behind the scenes. This of course needs configuration on the server, like the others. The others? Take a look here: http://socialcompare.com/en/comparison/javascript-online-rich-text-editors
A little word of warning: Textbox.io is not free - in fact it is pretty expensive. Hopefully the technique shown in this article can be valid for other editors as well.
How to enable Textbox.io in XPages
I have created a sample database where I demonstrate how to include Textbox.io in your XPages solution.
Create an empty database and set the Access Control List (ACL) to allow to editor access for Anonymous users.
The reason for having editor access is that the XPage later needs to update a temporary document. Another solution could be to work with writable public documents.
Download the API from http://textbox.io and make it available to XPages
One way is to copy the textboxio-directory directly to your Domino server's Domino\html-directory. The main benefit of this approach is that the Textbox.io files are available to all databases without any further ado. However, I found somewhat cumbersome to import and use these files in XPages, even though I understand that it is easy and possible to do with XPages Themes.
Another way is to import the textboxio directory directly into the XPages database. I found the article "Importing an entire JavaScript library into a database" (http://linqed.eu/2012/10/09/importing-an-entire-javascript-library-into-a-database/) by Mark Leusink, I was able to just drag the whole directory into the WebContent area. To make the WebContent-area visible, you have to switch to the Java perspective in the Designer, like this:
By having the textboxio-resources here, they are immediately available to the XPages.
Switch back to the XPages perspective if you prefer.
Ensure that your database can display detailed XPages errors - and - that the Extention Library is included in the database.
Yes, you need Extension Library from OpenNTF for this project. I use the ExtensionLibraryOpenNTF-901v00_12.20150311-1316.zip version.
Create the back-end Notes forms to hold the data. In the example database I have created some super simple forms, one with the design-alias fPage and one with the alias fTemporaryRichText. The first form will be the hinge, containing the complete HTML in the end. The latter form contains the rich text content as it is whenever the user press Save. Post-processing will combine the two documents into a single fPage-document in the end.
Below you see the fPage being created:
Below you see the three fields inside the Notes-form;
Nothing fancy about any of the fields. Note that the rtContent-field is an ordinary rich text field too, no "Store contents as HTML and MIME".
The same goes for the fTemporaryRichText-form:
Again, nothing fancy here.
How to code the XPage
Normally I would put my XPages stuff into Custom Controls, but for the sake of simplicity I just create a XPage.
Below you see a screen shot of the page with its 5 main components;
- A XPages Remote Service
component from OpenNTF Extension Library. I use the JSON RPC variant of
the Remote Service component later. This is the most important part on
the page, as it enable my frontend javascript to talk directly to my backend
serverside javascript and thus enable me to actually save and later read,
the content of the rich text.
- A computed field bound to the
txtUNID-field on the Notes form. I need an unique key which later can be
used as a key to connect the page with it's appurtenant content-document.
- Simple caption just so you find
the page again!
- Panel that will be treated as
a standard HTML-div. The class of the panel is "inputHTML". The
panel will be replaced by the Textbox.io editor during initialization of
the page.
- Save buttons which extract the HTML from Textbox.io editor and stuff it into the Remote Service above.
Behind the scenes I also use the Remote Service to read the content if it already exist, and thus feed the HTML into the editor. You find this code in the onClientLoad-event on the XPage itself, as shown below;
I will go into great detail about the rpcPage-object later, but for now it is pretty clear that we get the HTML if it exist, and put it into the global javascript editor referenced by the g_divEditor variable. That variable is simply created in the following script code;
This is also where the textboxio-code comes to action and do the actual replacing of the div with the class "inputHTML".
How to get a unique key that doesn't change at the second you try to save the document?
In classic Notes the main trick is to use a computed when composed field, with some sort of unique-code like @Text(@DocumentUniqueID()) or @Unique as the formula. Since it is computed-when-composed the value will never change again.
It turns out that the concept of computed-when-composed doesn't quite exist in XPages, probably due to the stateless nature of the HTML. One nice writeup of this is found in Brad Balassaitis' Computed When Composed Fields in XPages . In essence one of the tips involves working with the XPage's beforePageLoad-event. I found another source for the same technique in Kathy Brown's XPages: No Experience Needed presentation from IBM Connect 2013. Below you see my version of these tips:
The code is placed in the beforePageLoad-event (1 and 2) by using the script editor (3). The server side javascript (SSJS) code does the following:
First we check if the documentPage is a new document. documentPage is the data source name for the data binding on the XPage - as shown below:
If so, we create a unique string. I like to use the UNIDs and thus create a dummy document and grab the UNID at (4).
At (5) I save the UNID back to the backend Notes document's field txtUNID. Remember that this field is bound to the XPage's computed field computedUNID.
At (6) I also save the UNID to the viewScope's UNID variable. This will later be referenced when we set- and get the HTML.
If the document isn't new, we copy the value from the backend Notes document at (7) into the viewscope variable. Thanks Kathy for showing me this!
This means that I now can access an UNID via the viewScope-variable. It doesn't change during the lifetime of the page, and that behaves much like a computed when composed field in Notes.
The basic XPages setup
Nothing too spectacular here. Note the data source name.
1. The computed field inputUNID
Note that the computed field is bound to the txtUNID field.
2. The caption edit box
This field is bound to the txtCaption field in the fPage form.
3. The panel with class "inputHTML" - the placeholder for the editor-to-come
This panel (which will be equal to a div when page is rendered) will be replaced by the Textbox.io editor during initialization of the page.
Textbox.io supports both div and textarea replacements. I can also replace div or textarea with a specific id, or a class.
When I worked this sample out I first tried to use a textarea, as you would probably get the data automatically transferred to the server during submit, but unfortunately I very quickly ran into the 32 kB limits in Notes. I tried all sorts of work-arounds, but due to my limited HTML/XPages knowledge, I couldn't get the data over to the server. I even tried to have a bunch of text fields holding each only a small number of bytes (think InputContentPart001, InputContentPart002 etc) and splitting the content from the editor into parts. Didn't work for me!
Therefore, I use a panel with a class attribute set, so the Textbox.io code can find and replace the panel by it's class, with the Textbox.io editor.
The resultant XPages code looks like this:
4. The Remove Service control - using the JSON RPC
One of the big hurdles in beginning web development - at least for me - is to fully understand how and when data will be sent back and forth between frontend JavaScript and backend serverside JavaScript.
Now, this isn't a problem if you just stick to the standard XPages controls available out of the box. You can easily create forms with fields, rich text fields, file upload- and download controls almost without programming. Data travels nice between frontend and backend!
If you want to do something special, things change - probably because of me not having enough knowledge! Way too often I end up fighting with my code, trying to relay data, and ending up with nothing on the other end! It reminds me a lot of classic Notes agent-programming back in the beginning of Notes development. It took many years to master how and when to do stuff with @formulas too
The Extension Library brings a new kid to town, meet The Remote Service control! The Remote Service control creates an easy to configure and easy to use pipe between frontend and backend. It is also very very fast and called instantly, meaning that I do not depend upon different states or phases. When the code is called, it is called!
One of the references I found that helped a lot was Brad Balassaitis's article Improve XPages Application Performance with JSON-RPC. Unfortunately this article is published on the soon-to-die THE VIEW, but I also found it here. After fiddeling with the Remote Service, I couldn't understand why I couldn't save values to my own document, but Brad address this caveat here:
(screen shot from THE VIEW article)
The pepper is here: "Also, if you make any changes to the current page in the SSJS procedure, they will be lost"
Unfortunately the article by the late Tim Tripcony (RIP) doesn't work, and I can't seem to find it either. Therefore I had to work out my own way of storing data. I ended up having a temporary document (bound to the form fTemporary RichText) linked to the main page by the UNID retrieved from the viewScope.
By the way, another good resource for understanding the JSON RPC is John Jardins blog article XPage vide tutorial - Remote Services (RPC).
Ok, armed with info, add the Remote Service to your XPage.
Below you see where I found it in the Controls palette;
Many places you'll see that it is recommended to put the Remote Service control in a custom control which appears on all your pages, such as in an Application Layout control. This way you have it accessible from everywhere.
Below you see how it is configured in my database:
The circled serviceName property is given a name rpcPage. This is the name that I will reference the JSON-RPC control by later on. The really cool thing about this control is that you quickly can create your own methods to it! Remember, these methods will be directly accessible to frontend javascript on your client!
Below you see how I have expaned the methods-property from the screen shot above;
See the name property first, marked at (1). I called my first method setHTML (the idea is that I put, store, save or set the HTML in the temporary document). The setHTML method accepts to string parameters, paramRTFieldName and paramHTML at (2) and (3). Finally the server side javascript is placed in the script-method marked by (4).
Taking a look at the SSJS script below;
As you see, I have a some debug-statements in my code too. Makes it easy to follow what happens in a Domino Console. The code above open a backend view lupTemporaryRichText and refreshes it. First thing is that we retrieve the UNID from the viewScope-variable UNID. Then the code tries to grab any existing temporary document with that UNID. If it wasn't found, the SSJS code will create one and set the form and txtParentUNID fields.
Next the code checks if it found a rtContent-field, and if so, delete it. Then it is time to create the rtContent rich text field, and append the paramHTML text to it. Finally the document is saved.
In other words, here we have immediate SSJS-power directly from CSJS side!
One minor disadvantage is that the code editor dialog box above isn't a full fledged code editor. You are on your own code wise here, and perhaps it can be wise to pack the code in something debuggable first
.
Ok, the next method I have put into my rpcPage-object is getHTML() which does the reverse thing. If it find a temporary rich text content document when the page is first opened, it returns the HTML back. The idea is here to be able to retrieve any content previously stored.
How is the JSON RPC controll used and called in the XPage?
The last piece of the puzzle is now to call the rpcPage object's methods setHTML to save the HTML and getHTML to load the editor with any existing data.
First the setHTML(). On the Page I have two buttons, the Save and Close which is a submit button and the Save button which is an ordinary button. The code for both buttons are excactly the same. Below you see the code:
I have added the code on the OnClick-event (1) on the Client tab (2) using the Script Editor (3).
First I grab the content of the editor (marked with (4)) via the global javascript variable g_divEditor's content.get(). This is the API from the editor Textbox.io, click here to see the description of the set- and get methods.
At (5) I call the rpcPage's method setHTML with the parameters. Easy! Note that I return an rpcObject which I add a callback to at (6). This callback will be called when the setHTML is finished.
Now you can save the HTML, which behind the scenes is stored in a temporrary rich text content document!
How to get the HTML at page load and fill the editor with any existing HTML?
When we open an existing page, it might have an appurtenant rich text content document too. If so, the rich text from this document should be read and fed into the Textbox.io editor at page load. I have stored the following code in the XPages onClientLoad event, at the Client-tab (2) using the Script Editor at (3);
Almost the same code as for the save buttons, but now I use the getHTML() method instead at (4). Again I add a callback at (5), which gets any potential HTML and feed it into the Textbox.io editor via the content.set() method. Easy!
Wrap it all up with a simple view
Just to have a small view around the Page with Textbox.io editor on it, a view like this has been created;
Click on New page to create a new document, or click on the caption to open existing documents;
Hope this is helpful for someone!
Ideas for further development
- In order to focus on the concepts, the
code above is very minmalistic. So, robustify it at will.
- Put the rich text editor handling into
a custom control. On OpenNTF there is a nice article XPages
Tinymce Custom Control which does
this with another rich text editor.
- I would have some sort of post save
processing grabbing the content from the temporary document and storing
it back to the parent page document, thus keeping everything in one place.
- I would probably also like to have some
kind of agent running over newly created pages and do some sort of extraction
of the base64 encoded images to real files, and change the HTML to use
links instead.
| Permalink | ![]()
![]()
![]()
Comments
You mention not finding an article of Tim's. His blog is archived here: { Link }
Posted by David Leedy At 17:24:33 On 24.05.2015 | - Website - |
Posted by Robert Ibsen Voith At 17:50:38 On 24.05.2015 | - Website - |
Posted by Johnny Oldenburger At 18:51:27 On 24.05.2015 | - Website - |
Posted by Robert Ibsen Voith At 19:42:54 On 24.05.2015 | - Website - |
Posted by Sean Cull At 20:58:08 On 24.05.2015 | - Website - |
Posted by Robert Ibsen Voith At 21:08:26 On 24.05.2015 | - Website - |
Posted by patrick kwinten At 18:23:46 On 25.05.2015 | - Website - |
Posted by Andrew Roberts At 19:25:33 On 26.05.2015 | - Website - |
Posted by Brendan At 18:52:25 On 28.05.2015 | - Website - |
Posted by Robert Ibsen Voith At 21:32:52 On 28.05.2015 | - Website - |
I'm the Director of Products from Ephox. Thanks for writing such a great article about our new editor, Textbox.io and integrating it into Notes.
With respect to the copy and paste, what we've tried to do is port the user experience and a lot of our knowledge from EditLive! to Textbox.io and used the new clipboard APIs you mentioned. In addition to the image support you've noticed, which some other editors are introducing, we also have image copy and paste from Microsoft Word and Textbox.io is the only editor that has that.
We've also recently made a cloud-hosted version of Textbox.io available for people to integrate. This is the first time that someone's made a WYSIWYG editor available as a cloud-based API so currently it's a free trial for those who want to use it and we'd welcome any feedback. While it's hosted in the cloud you still get the full Textbox.io API to work with when integrating so you can still follow the process you've put in the article.
Thanks again for the great article,
Damien
Posted by Damien Fitzpatrick At 02:09:31 On 25.06.2015 | - Website - |
Posted by Brendan At 13:15:36 On 17.12.2015 | - Website - |
Posted by Robert Ibsen Voith At 09:03:59 On 23.12.2015 | - Website - |
Kind regards,
Martin
Posted by Martin Vereecken At 15:11:04 On 16.03.2016 | - Website - |
Nice article.
Is it possible to use the editor on RichText fields in existing applications?
I'd like to have some kind of hybrid solution where people can use either the Notes Client (without using xpinc) or an interface trough a Web browser.
Kind regards,
Tom
Posted by Tom Van Aken At 12:27:41 On 12.10.2016 | - Website - |